
I wanted to make a post and discuss a tree of ‘instancing geometry-nodes’ I had been working on, originally to produce Rose Window designs. I worked on this a couple of weeks ago and produced the first design – The Cosmos Flower Rose Window; which you may have read about in a previous. post.
I was going to write a more in-depth post on this geometry node set-up for the Rose windows, but having a wandering creative mind as I do, it often jumps and thinks about creating something else before I have got to writing that in-depth post…after all I am certainly more of an artistic person than a writer!
So today that is what I started doing. I had a thought about extending that geometry node set-up so I could build ‘up’, as well as ‘out’. So I set about it and modelled what you are seeing in this post. I also wanted to demonstrate this with something ‘quirky’…just for fun😊. So I built a ‘Tower of Fruit & Wine’. now I know when you look at this tower it is most probably physically impossible…but that is the great thing with Blender! You can make the impossible ‘possible’, and that is why I love this work.
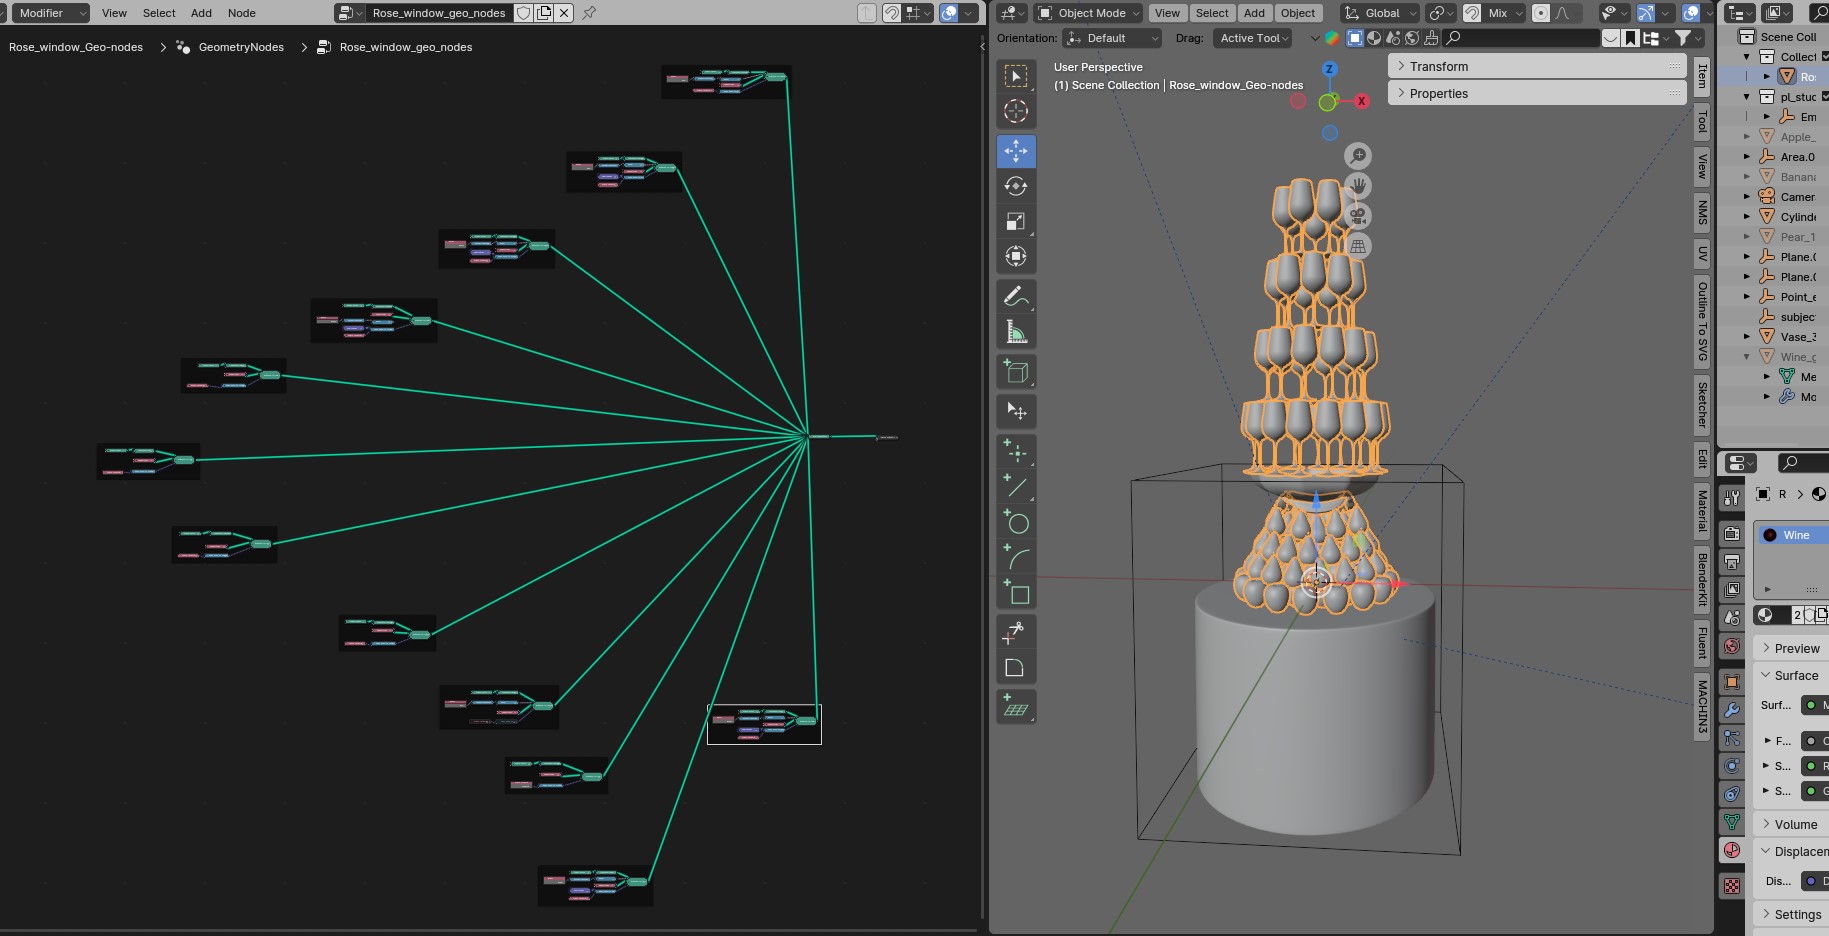
So lets have a quick look at this twelve layer geometry node set-up for the Fruit & Wine Tower in the rendered image:
Geometry Node 12 layer set up for the Fruit & Wine Tower:
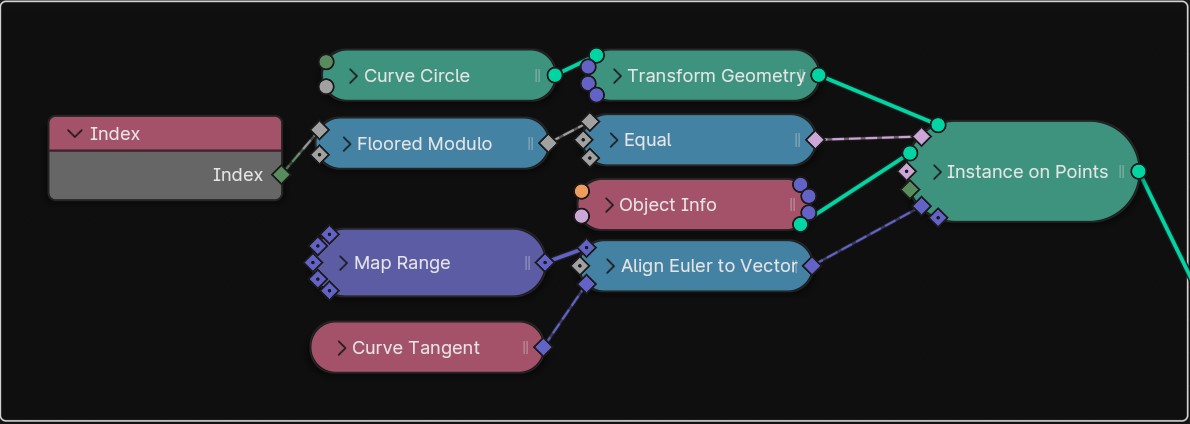
The Individual geometry node frame set:
The Geometry node frame – expanded:
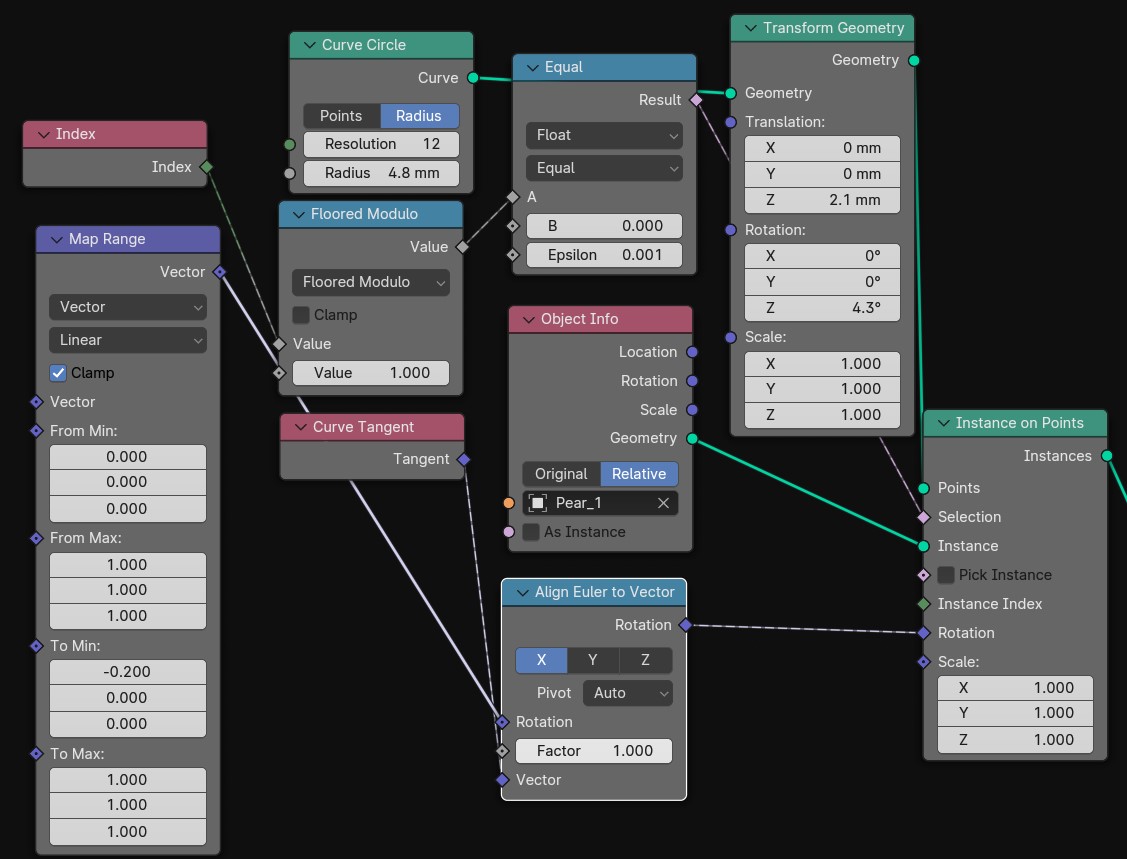
So What is going on in the expanded node frame above ?
So what we are doing essentially is ‘instancing’ an modelled object on a ‘Curve Circle’, which is to say we are taking that object and Blender is creating one instance of that object on every vertices of the specified Curve Circle resolution – Which in the above you will see has a resolution of 12 vertices. This resolution can be anything we specify, as can the Curve Circle Radius, which in the above you will see is set at 4.8 mm.
This expanded frame above is creating the first layer of ‘Pears’ sat on top of the layer of Apples. So lets try and break it down a little into bullet points for the above image.
- The ‘Instance on Points’ node takes the information from the ‘Curve Circle‘ node (Resolution + Radius) and instances the Object, fed in from the ‘Object Info‘ node.
- Object Info node – takes the ‘Pear_1’ object and ‘instances’ this on the points/vertices of the Curve Circle via the ‘Instance on Points’ node.
- The ‘Transform Geometry’ node is used to move that circle of Object (pear_1) if we need to rotate it into place, or move it up or down.
- The ‘Map Range’ and ‘Align Eular to Vector’ nodes are fed into the Rotation input of the ‘Instance on Points’, and are used to align all the objects to face the same central vector – rather than them all facing north, south, east, or west as such!
- The two blue ‘Math Nodes’, in this case the ‘Floored Modulo’ and ‘Equal’ nodes, feeding into the Selection input of the ‘Instance on Points’ are used if we want to skip or subtract some of the instances. In this case we are just instancing all 12 Pear_1 Objects.
So that is essentially what is going on for each branch of the node-tree, generating our ‘Tower of Fruit & Wine’. Of course each branch of this tree will have it’s specific objects, in this model it is either the ‘Apple’, ‘Pear’, or ‘Wine Glass’.
The great thing about this is you can build as high, wide, or as complex as you heart desires, or your computer can handle 😊.
And of course you can play about and move objects in all directions, so you are only limited by your imagination!
The End Results of the above geometry node set-up:
Of course it doesn’t stop here, you of course need to apply you relevant materials, lighting, HDRI set-up, and render the final image…but these are for another post. Maybe in the next next post I will discuss the procedural material set-up for the Pear you see in the image…it is quite complex but fun and interesting to build!
Here is my first render from the above set-up:
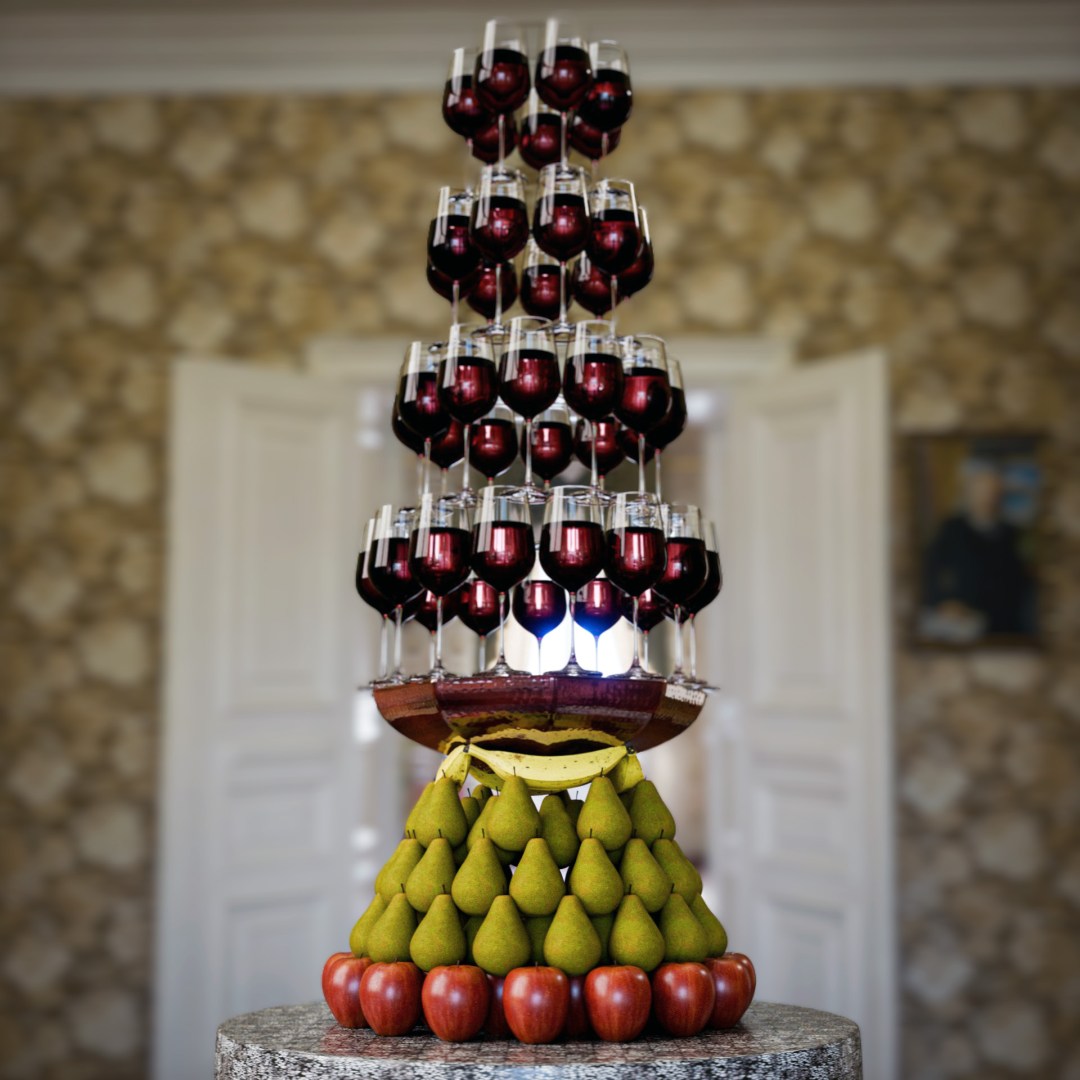
What do you think? Quirky but fun isn’t it😊. Of course given more time you would spend time maybe on varying the materials a little to mix up the fruit finish, but I think for a first render and for this demo image resolution this is probably enough.
Anyway, I hope you like my fun ‘Tower of Fruit & Wine! do let me know what you think? I know it is probably physically impossible in real-life! but this is Blender modelling life…not real life😉.
I hope you like the post. Contact me if you want more information on how to set this up. I hope you all have a great day!
Kind regards, Jay
Discover more from Jayargonaut - Watch Designer
Subscribe to get the latest posts sent to your email.

Really like the final product; you have an eye for creative design! 👏 As for all that technical stuff, not my cup of tea!🙂
LikeLiked by 2 people
Thank you Jiten😊 I appreciate your kind words 🙏. I am glad you like it. I understand many won’t be interested in the technical stuff, I put it in there in case any viewers want to try it for themselves…I always like to help people where I can. Thank you again & have a great day my friend! kind regards…Jay 😊
LikeLiked by 1 person
This is so refined and magical!
LikeLiked by 1 person
Thank You Ojaswi 🙏. I appreciate your kind words! Kind regards…Jay 😊
LikeLiked by 1 person
Fabulous creativity and execution. Do not understand the program you were using but that’s not necessary. From my vantage point I am a client looking at a product that is beautiful.
LikeLiked by 1 person
Hi Margot 😊. Thank you very much for your kind words 🙏. I sincerely appreciate them! Thank you. Kind regards…Jay 😊.
LikeLike
Very interesting, I only dabble in blender a little, I didn’t know this is what nodes are for! Thanks for posting!
LikeLike
You are welcome Ogden! Nodes are a very powerful tool in blender, mostly used for creating materials and geometry I would say. It is a useful thing to learn and quite simple to understand once you get your head around the concept. It is like ‘coding’ in computer code, but you are using ‘building blocks’ of code, like ‘scratch’ code, if you have ever come across this? they teach kids it in junior school to get them learning coding; you are coding but with predefined building blocks. It is a similar concept. Have a play with it and it will certainly open up what you are able to do. Kind regards…Jay😊👍
LikeLiked by 1 person
Wow, so glad you gave what is probably a really simplified explaination of how you create youe works of art.
LikeLiked by 1 person
Thank you Madison 😊. I am so glad you like it! I do try to explain things as much as I can, although I am not a natural writer, so I really appreciate your kind comments. Thank you…Jay😊
LikeLiked by 1 person
Hey Jay! Such a beautiful end result… unique ones.. great to see more✌️And may i know the application that you are using to create these models..
LikeLiked by 1 person
Hi Sowmya & Uma😊. Thank you for your kind words, I am glad you like it✌️. Yes of course…I use Blender – which is a 3D creation suite. You can pretty much do everything in it: design, 3D modelling, Animation, film effects etc. It is a fantastic piece of software, and what is awesome is it is totally open source & free! It does take quite a lot of learning, but if you have an interest just stick with it and learn…there are lots of resources to help you. I can point you in the right direction if you would like. Udemy has some great and cheap courses to follow. here is a link to the software:
https://www.blender.org/
I hope this helps😊. Please feel free to ask if you would like any help with anything✌️. Kind regards…Jay
LikeLiked by 1 person
Thank you so much for this huge information & showing the way Jay.. means a lot 😊 i’ll be looking on it and post more learning blogs on it, we will be waiting 💥
LikeLiked by 1 person
You are most welcome😊. If you need any help, or need pointing to any good and helpful courses etc, please just let me know👍. Best…Jay😊
LikeLiked by 1 person
Pleasure is ours and Sure 😊👍
LikeLiked by 1 person